If there is something strange, in your proxy routes, who ya gonna call?

This time the answer is: Traefik 😎
Table of contents
Open Table of contents
Hello, Traefik
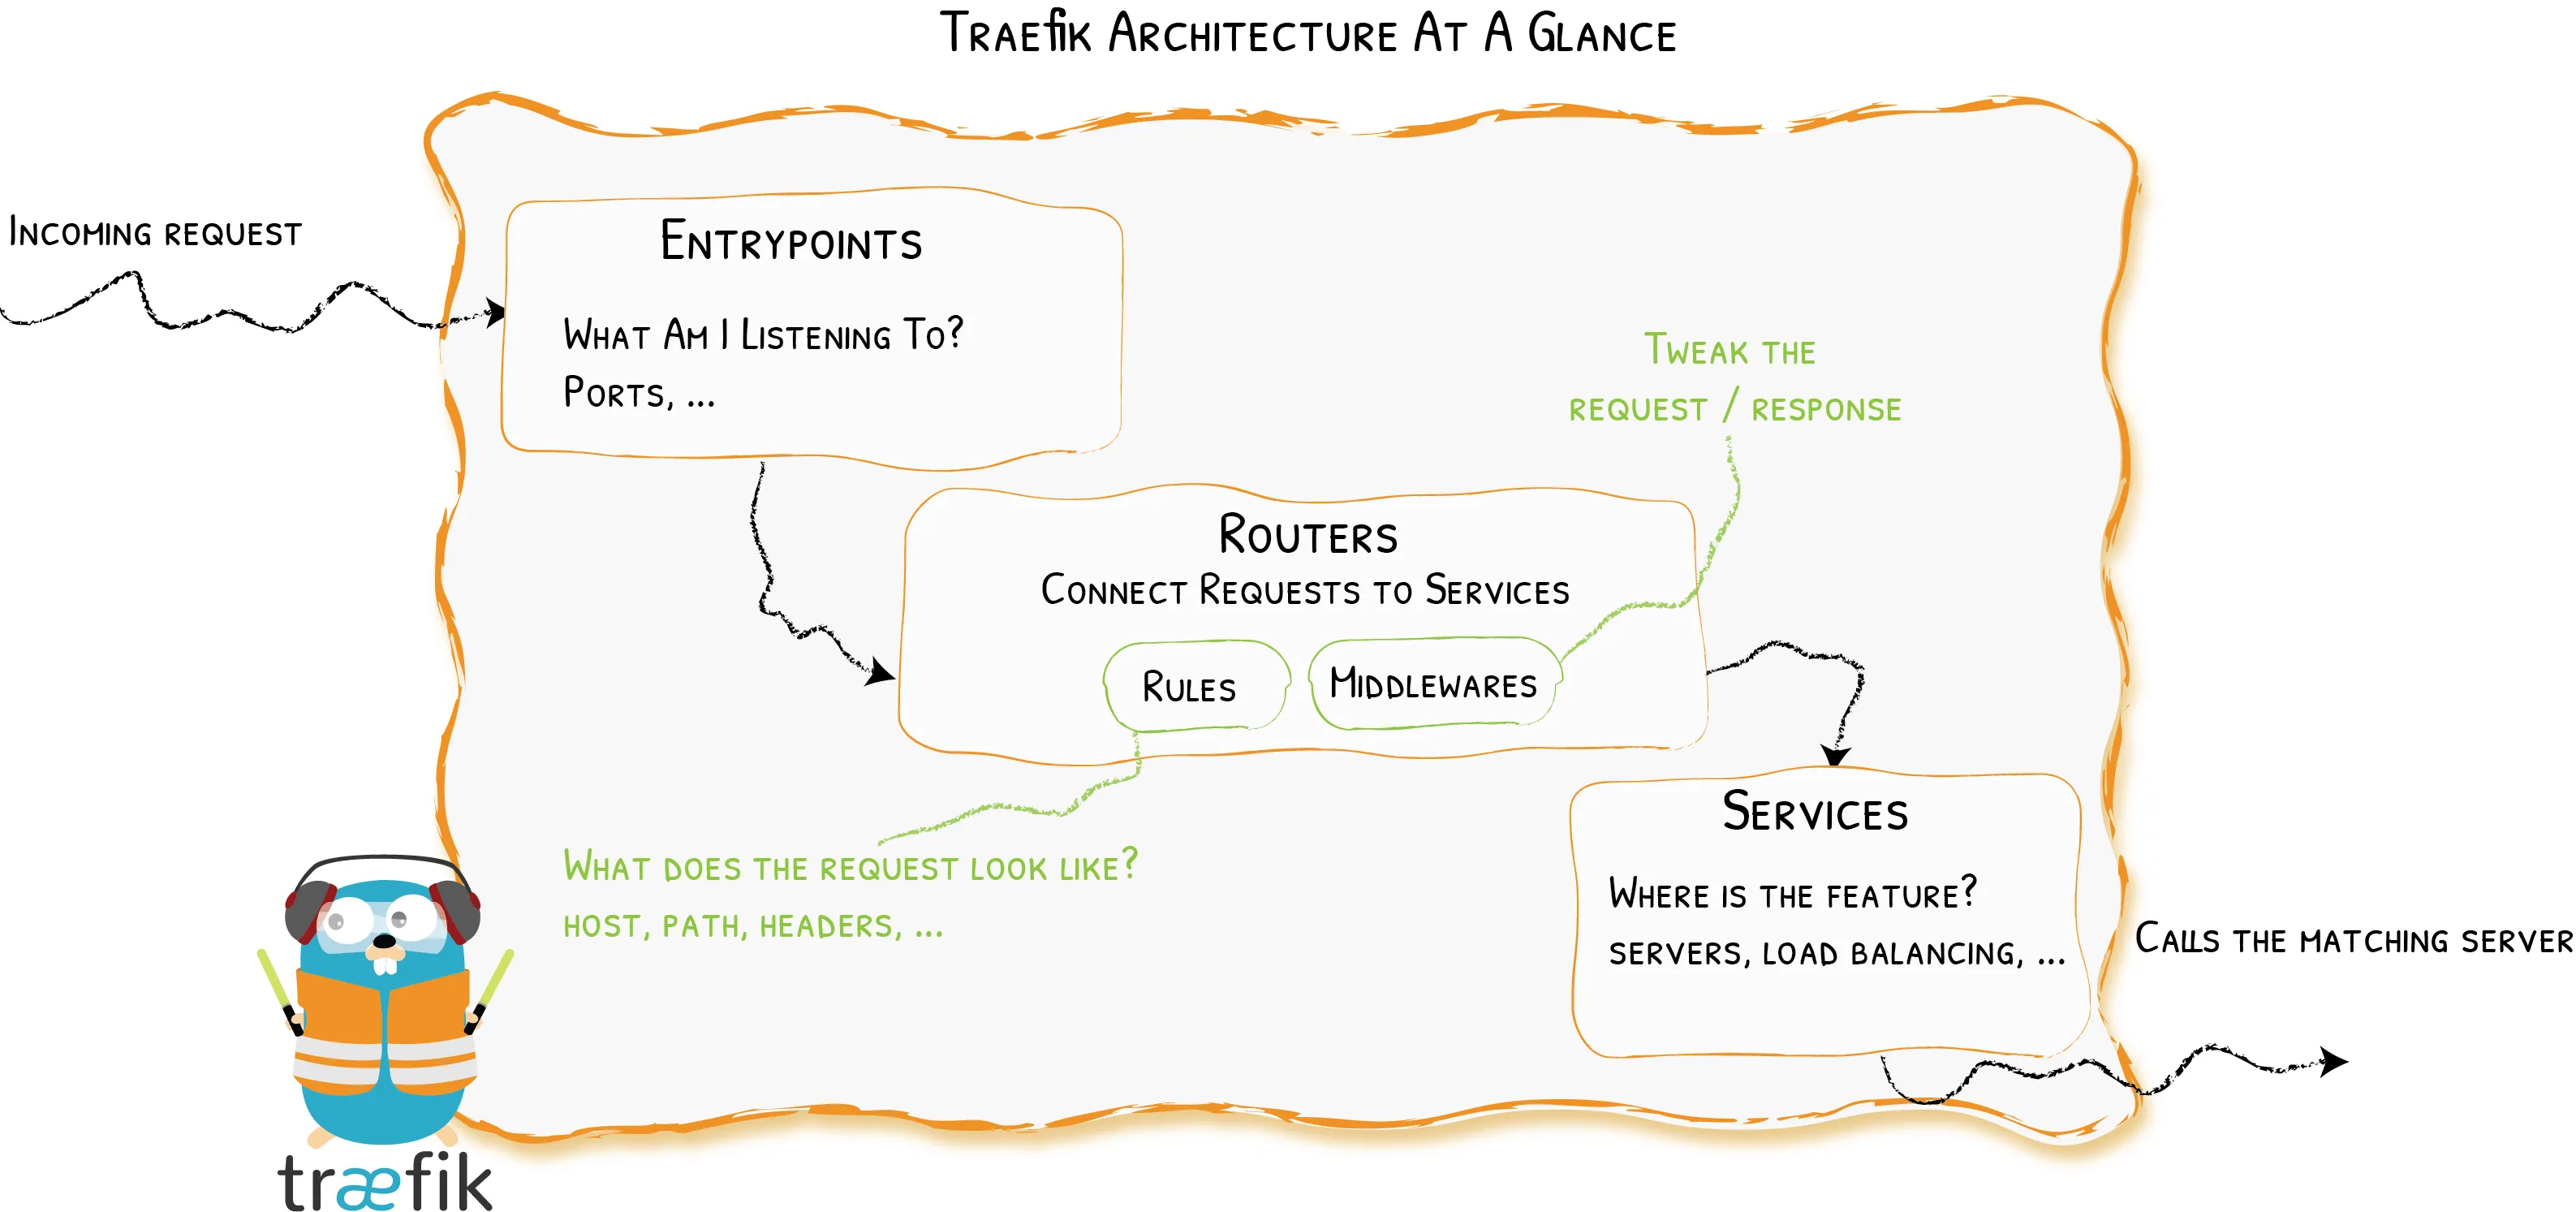
Traefik, pronounced traffic (/‘træfɪk/), is an open-source reverse proxy that makes publishing your services easy. Version 2.x is sensibly different from version 1.x, and it introduces different powerful components with an even more clear responsibility (see this migration guide for more). Old components, such as frontends and backends, has been replaced by the interoperability of routers, middlewares and services. Long story short:
- Routers connect incoming requests to the relative services that can handle them.
- Middlewares can tweak each request (e.g., adding or removing headers, redirecting the request, managing authentication, etc…).
- Services forward requests to your services. They can also be responsible for the load balancing.
And here comes the magic: Traefik can automagically inspect your infrastructure in order to publish your services without managing separate configuration files. This discovery process works with many Providers (i.e., existing pieces of infrastructure). In this post, we go over the basic interaction with Docker.
Setting up the Traefik container
Traefik
can be configured in different ways.
In the following examples, we will be using commands and labels in
docker-compose files to keep all the things nicely in one place, but YMMV. We
keep separately just environment details that we don’t want to hard code into
our docker-compose.
All right, it’s time to start 🚀
First things first. We need to spin up a Traefik container. I usually do that
with a docker-compose file like this one:
Expand docker-compose.yml
version: "3.7"

services:

# a cool reverse-proxy / load balancer

traefik: # The official Traefik docker image (v.2) image: traefik:v2.2
container_name: traefik security_opt: - no-new-privileges:true restart: always
volumes: # So that Traefik can listen to Docker events -
/var/run/docker.sock:/var/run/docker.sock:ro # tls-certificates path (TLS) -
./letsencrypt:/letsencrypt ports: # http -
${HTTP_PORT}:80 # https -
${HTTPS_PORT}:443 command:
########################################### # Static Configuration harnessing
CLI # ########################################### # Activate dashboard. -
--api.dashboard=true

      # Log level in traefik logs (Default: ERROR)
      - --log.level=${DEBUG_LEVEL}

      # Enable Docker backend with default settings.
      - --providers.docker=true
      # Do not expose containers by default.
      - --providers.docker.exposedbydefault=false
      # Default Docker network used.
      - --providers.docker.network=proxy

      # --entrypoints.<name>.address for ports
      # 80 (i.e., name = webinsecure)
      - --entrypoints.webinsecure.address=:80
      # redirection to https
      - --entrypoints.webinsecure.http.redirections.entrypoint.to=websecure
      - --entrypoints.webinsecure.http.redirections.entrypoint.scheme=https
      # 443 (i.e., name = websecure)
      - --entrypoints.websecure.address=:443

      # certificatesresolvers
      - --certificatesresolvers.leresolver.acme.tlschallenge=true
      # Email address used for registration
      - --certificatesresolvers.leresolver.acme.email=${CERTIFICATES_EMAIL}
      - --certificatesresolvers.leresolver.acme.storage=/letsencrypt/acme.json

    networks:
      # This is the network over which Traefik communicates with other containers.
      - proxy

    labels:
      ################################################
      #   Dynamic configuration with Docker Labels   #
      ################################################
      # You can tell Traefik to consider (or not) this container by setting traefik.enable to true or false.
      # We need it for the dashboard
      traefik.enable: true

      # Dashboard
      traefik.http.routers.traefik.rule: Host(`your-cool-dashboard.example.org`)
      traefik.http.routers.traefik.service: api@internal
      traefik.http.routers.traefik.entrypoints: websecure
      traefik.http.routers.traefik.tls.certresolver: leresolver
      # Declaring the user list
      #
      # Note=all dollar signs in the hash need to be doubled for escaping.
      # To create user:password pair, it's possible to use this command:
      # echo $(htpasswd -nb user password) and then save user and password in
      # the .env file
      traefik.http.routers.traefik.middlewares: traefik-auth
      traefik.http.middlewares.traefik-auth.basicauth.users: ${DASHBOARD_USERNAME}:${DASHBOARD_PASSWORD}

networks:
  proxy:
    external: true
Whoa! Lots of things here. Let’s break them down.
Basic stuff
To get started, we have to pull the traefik:v2.2 image. So far so good. Then,
in order to manage http and https requests, we bind the container ports 80
and 443 to host ports ${HTTP_PORT} and ${HTTPS_PORT}, respectively. As
mentioned, you can set the host ports you want to map to into a separate .env
file as follows:
HTTP_PORT=<HTTP PORT>
HTTPS_PORT=<HTTPS PORT>
It’s worth noting that in the docker-compose file there is a static and a
dynamic section. Indeed, the general behavior of Traefik is defined in a
static part that is not supposed to change frequently. We deal with such a
static configuration with a few CLI commands in the compose file. For example,
we can set the log level this way:
services:
  traefik:
    command:
      # Log level in traefik logs. E.g., set DEBUG_LEVEL=INFO in the .env file
      - --log.level=${DEBUG_LEVEL}
On the other hand, we have the dynamic section that manages how requests are handled. It changes frequently and it is hot-reloaded. Dynamic configuration can be managed with labels attached to containers.
Docker provider
Now we need to enable the Docker provider. We add the following lines to the compose file:
services:
  traefik:
    command:
      # (i) Enable Docker backend with default settings.
      - --providers.docker=true
      # (ii) Do not expose containers by default.
      - --providers.docker.exposedbydefault=false
      # (iii) Default Docker network used.
      - --providers.docker.network=proxy
Those are just CLI commands that tell Traefik (i) to use Docker, (ii) without
exposing each container by default, and (iii) using a network called proxy for
connections to all containers.
Besides, in the service-level networks key, we specify that we want Traefik to
connect to the network proxy. In addition, in the top-level networks key, we
define proxy as an external network. See here:
services:
  traefik:
    networks:
      # This is the network over which Traefik communicates with other containers.
      - proxy

networks:
  proxy:
    external: true
Moreover, we bind mount the unix socket used by the host Docker daemon to its counterpart into the Traefik container.
services:
  traefik:
    volumes:
      # So that Traefik can listen to Docker events
      - /var/run/docker.sock:/var/run/docker.sock:ro
Entrypoints and https redirection
A pivotal static configuration part aims at defining our network entrypoints and redirections as follows:
services:
  traefik:
    command:
      # --entrypoints.<name>.address for ports
      # 80 (i.e., name = webinsecure)
      - --entrypoints.webinsecure.address=:80
      # redirection to https
      - --entrypoints.webinsecure.http.redirections.entrypoint.to=websecure
      - --entrypoints.webinsecure.http.redirections.entrypoint.scheme=https
      # 443 (i.e., name = websecure)
      - --entrypoints.websecure.address=:443
We define the entrypoints:
webinsecureforhttpon container port80websecureforhttpson container port443
In addition, we redirect every non-http requests to https.
Automatic Certificate Generation
And the magic goes on! Traefik can leverage Let’s Encrypt to obtain valid certificates. We can put those lines in the static configuration in order to define how we want Traefik to get certificates, harnessing (in the example below) the TLS challenge.
services:
  traefik:
    command:
      # certificatesresolvers
      - --certificatesresolvers.leresolver.acme.tlschallenge=true
      # Email address used for registration (again, set CERTIFICATES_EMAIL in the .env file)
      - --certificatesresolvers.leresolver.acme.email=${CERTIFICATES_EMAIL}
      # Where to save certificates (the folder `letsencrypt` can be bind mounted)
      - --certificatesresolvers.leresolver.acme.storage=/letsencrypt/acme.json
Enabling the Dashboard
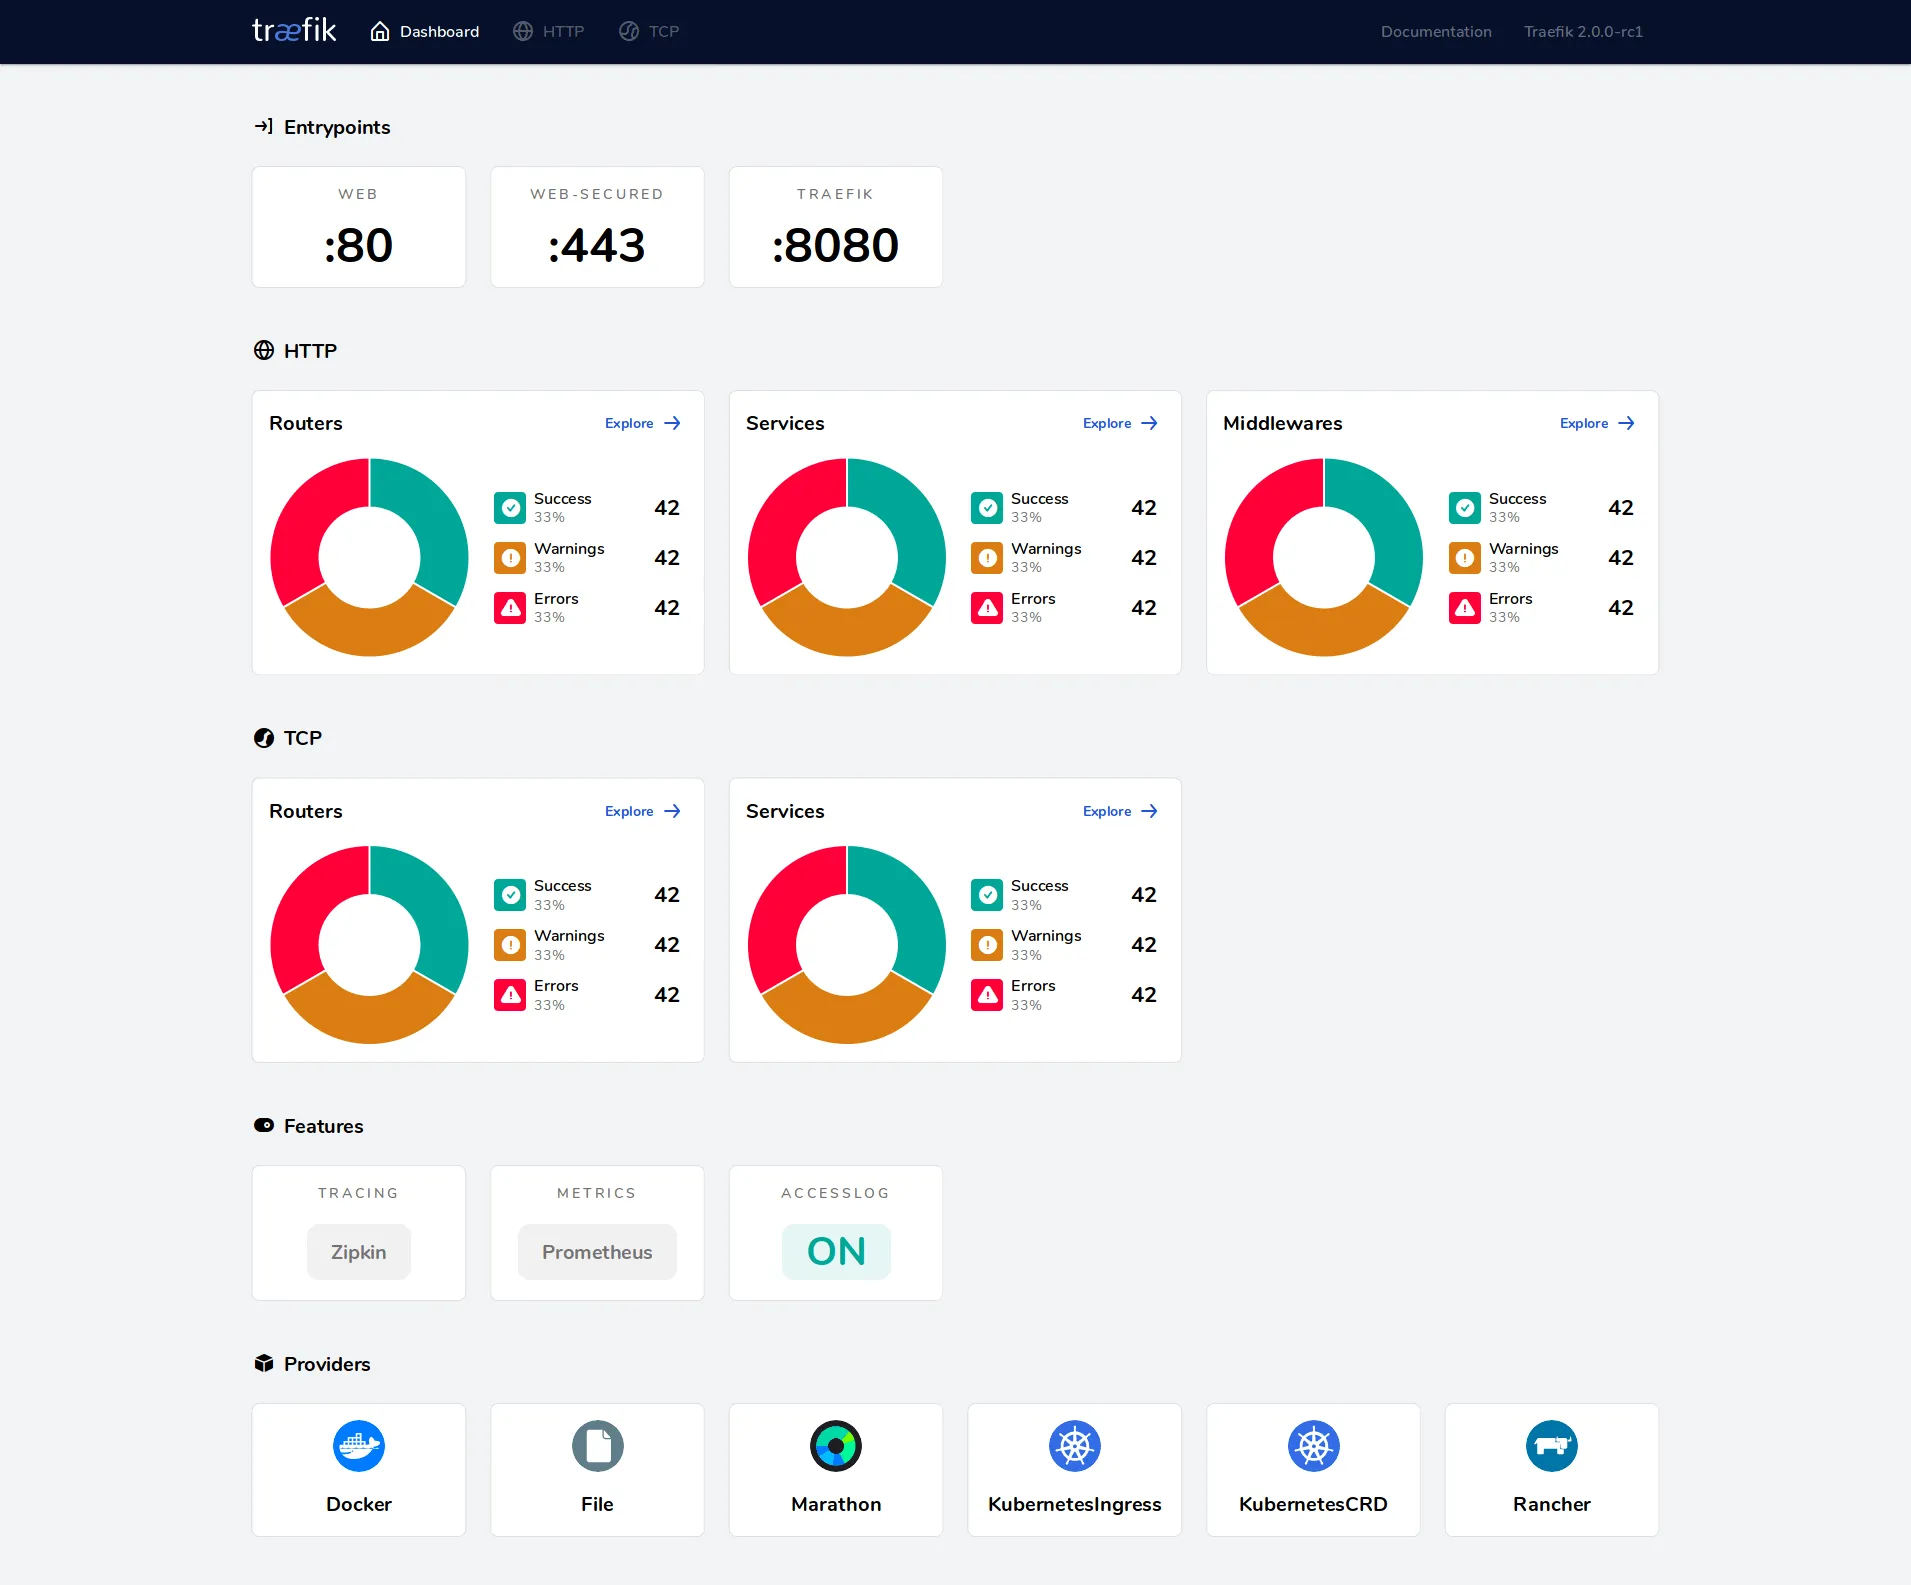
Another cool feature available out-of-the box is the web-based Dashboard that shows what is going on behind the Traefik scenes.
First, we need to enable the dashboard in the static configuration as follows:
services:
  traefik:
    command:
      # Activate dashboard.
      - --api.dashboard=true
Then, we have to deal with the dynamic configuration part by attaching labels to the Traefik container. We can do it this way:
services:
  traefik:
    labels:
      ################################################
      #   Dynamic configuration with Docker Labels   #
      ################################################
      # You can tell Traefik to consider (or not) this container by setting traefik.enable to true or false.
      # We need it for the dashboard
      traefik.enable: true

      # Dashboard
      traefik.http.routers.traefik.rule: Host(`your-cool-dashboard.example.org`)
      traefik.http.routers.traefik.service: api@internal
      traefik.http.routers.traefik.entrypoints: websecure
      traefik.http.routers.traefik.tls.certresolver: leresolver
      # Declaring the user list
      #
      # Note=all dollar signs in the hash need to be doubled for escaping.
      # To create user:password pair, it's possible to use this command:
      # echo $(htpasswd -nb user password) and then save user and password in
      # the .env file
      traefik.http.routers.traefik.middlewares: traefik-auth
      traefik.http.middlewares.traefik-auth.basicauth.users: ${DASHBOARD_USERNAME}:${DASHBOARD_PASSWORD}
Ok, let’s go through that. First of all, we set traefik.enable: true to tell
Traefik to consider this container in its automagic deployment. Then, we add a
router called traefik to handle all requests like
your-cool-dashboard.example.org which, in turn, will forward all incoming
requests to the service called api@internal (i.e., the Dashboard). This router
will only listen to the entrypoint websecure (i.e., https) and uses the
certresolver leresolver, which we have just defined in the static
configuration, to get valid certificates for this service.
Bonus part: the middleware traefik-auth for the
http basic auth. We introduce
this middleware to restrict the access to this service and we use it in the last
label to define a user:password pair. When you try to get the dashboard,
you’ll be prompted for a username and a password.
And that’s it! You are all set. Now, you can spin your Traefik container up.
Deploying with Traefik
What if you have to deploy a new project in this context? IMO, here is where the Traefik magic really shines.
Let’s say you want to deploy a dockerized whoami webserver. No worries, you have just to play around a bit with container labels and you are done. For example, here is a compose file for this purpose:
version: "3.7"

services:
  my-test-app:
    image: containous/whoami
    networks:
      - proxy
    labels:
      traefik.enable: true
      traefik.http.routers.my-test-app.rule: Host(`whoami.example.org`)
      traefik.http.routers.my-test-app.entrypoints: websecure
      traefik.http.routers.my-test-app.tls.certresolver: leresolver

networks:
  proxy:
    external: true
Nothing new here respect to the dashboard example. First, we attach this new
container to the Traefik network proxy. Then, we use traefik.enable: true to
say: “Please Traefik, take care of this container”. In addition, we create a
router to catch requests coming to whoami.example.org and forward them all to
this container service. Also in this case, we specify the entrypoint
websecure, and how to get certificates for this service (i.e., leresolver).
Nothing more than this, you are all set again! Now, you have just to run this
container and Traefik will magically deploy this service for you. Open up your
web browser, and get whoami.example.org to see the magic in action.
Further reading
This is just the top of the Traefik iceberg. Read the official docs or this cool Traefik + Docker tutorial for more.
Cheers!
^..^